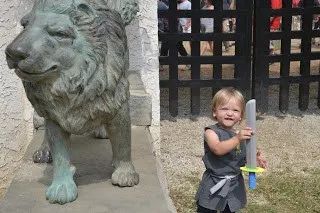


How to make a tunic for a knight costume for a child. This easy sewing project is fun for Renaissance Festival or Halloween.
This post may contain affiliate links which may earn me commissions should you click through them and take certain actions. As an affiliate for Amazon, Cricut, xTool, Home Depot, and other sites, I earn from qualifying purchases. Please DIY carefully. View my full legal disclosures here.
Please read the whole post so you don’t miss any important information!
I saw some of these ideas on Pinterest and had to make them for G. We love going to Renn Fest and what’s more exciting than dressing up your kiddo for the event?!
Maybe next year I’ll work up the energy to make myself and Daddy B outfits too. Haha. We will see.
These were going to be presents for G’s birthday at the end of September, but by the end of September I doubt I’ll want to be walking around Renn Fest much (I’ll be super pregnant then!) and I don’t think I can hold off on giving him such a fun present. No restraint.
This costume is separated into three blog posts:
The main part of the costume is, of course, the outfit! My favorite! Boys are soooooo much easier to sew costumes for that girls… we have that going for us with two boys! It’s also way less expensive. All I made was a tunic and we’ll throw a plain shirt and plain pants underneath it. I used this tutorial for the tunic, but I am going to add info on what I did a little differently. Like the author, I also made it large so hopefully he will fit into it next year. If not, Baby K will be able to wear it.
I used sweatshirt fleece to make this knight’s tunic and bought 1.5 yards. It was $19.49 but with the 60% off coupon I got $11.69 off. Total was $7.80.
I liked this fabric for the tunic because it was a bit lighter weight and more authentic looking than other types of fleece I looked at.
Instead of adding on the felt cross, I decided to download a design to embroider on using my embroidery machine. That way, the emblem for the tunic and the shield can match! Yay! Like a REAL knight. I think.
I made my pattern on a paper bag, adding about 6-7″ to the length. G wouldn’t stand up for me to get a good measurement when I was making the pattern. I ended up needing to cut some off… if you can measure your child, it’d be a lot easier.
I cut out my pattern and then the fabric. Then I embroidered the front piece with my design.


I had a lot of leftover fabric which I hadn’t anticipated. Oh well. There’s worse things in life than extra fabric- ha. For the colors, I checked out this website for what they mean. I ended up making the neck bigger because it was too small for his big head, especially where the fabric had zero stretch.

Tried it on (above) and obviously it was too long too so I just trimmed the bottom too. Lots of trimming going on, gosh I love fabric that doesn’t fray.
I cut off the strip of the bottom to make it shorter and ended up being able to use that strip for the sash so that worked well!
Here’s my handsome knight, after I fixed everything. I only got him to smile because I handed him the phone- what can I say… I’m not beyond a little bribery.